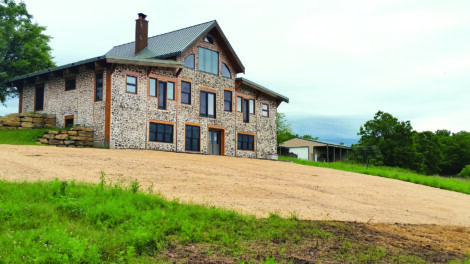
After nearly 30 years of living and working in Madison, Wisconsin, we longed for a rural home. We’d spent several frustrating years looking for rural property, but anything with livable buildings disappeared quickly. So we decided that in order to acquire our dream home, we were going to have to build it.
We started researching alternative building techniques and chose cordwood. Our planning process commenced with a discussion of what our dream home would include, and we laid out the floor plan with an inexpensive software program.
In 2002, we found and purchased our dream property in Moscow Township, Wisconsin. And in 2004, with our initial plan in hand, Kim rented excavating equipment and broke ground. Our cordwood house would be approximately 40 by 60 feet, with two floors and a loft. The southern exposure would allow for passive solar energy and a wonderful view of natural springs, rolling hills, and native wildlife.

Because of our decision to pay as we went, construction progressed slowly. In 2006, through a Focus on Energy program, we were able to install a grid-connected tracking solar panel. We also began digging 32-inch concrete footings in preparation for the 16-inch poured concrete walls, upon which the cordwood walls would be laid. Subsequently, we decided to hire an engineer to design the timber layout for an open floor plan.
In 2007, we rented concrete forms, and Kim put them together while tying the rebar in the forms. We then poured walls and insulated them. In 2008, we installed the radiant heat insulation underlayment, tubing, and grid, over which we poured the slab. We also poured internal concrete walls to create a pantry.
In March 2009, we used custom-made timbers and brackets to start framing with a block and tackle, until we realized this wouldn’t work for longer and heavier beams, and then we rented a construction lift. We harvested and milled property hardwoods for window and door frame construction. Roberta’s brother Tony, an experienced carpenter, assembled the timbers, roofing, and window frames.
In July 2009, we hired a crane rental company to place the highest and last rafters. Large tarps covered the framing between processes (and over winters). To get everything covered (though not enclosed) by winter of that year, we hired local companies to install a metal roof and add spray foam insulation. Because we expected to install a living roof, we applied Bituthene (an adhesive membrane) over 3⁄4-inch tongue-and-groove, end-matched Douglas fir decking on the east and west wings of the house. These roof sections would eventually be planted in sedum.

In October 2009, a truckload of 10-foot white cedar logs was delivered. The following April found us cutting this cordwood to 16-inch lengths (with an R-value of 24). We then proceeded to stack and split the logs and clean the log ends.
At long last, wall building began. We used lime mortar (1 part lime putty to 3 parts sand) between laid logs because of its slow curing, lack of carbon dioxide output, and heat characteristics. We poked sawdust or vermiculite and lime as insulation into gaps. We also installed window and door frames as the building progressed. We wasted no mortar, because we’d stop at the end of batches. We protected unfinished wall sections with tarps.

The last row of wood closest to the ceiling was always the hardest to lay. In addition to hauling mortar and wood to the highest levels, our workspace was small. We used metal scoops with loose insulation as long as we could, sometimes spooning it in with a kitchen tablespoon. The wind drove its way through those small spaces. We tacked and glued strips of rigid foam to the ceiling and used caulk and foam to fill the final narrow spaces.
Each year, we’d end construction season before continuous 20-degree-Fahrenheit days were predicted. Lime mortar doesn’t set well in freezing temperatures. The end of the season also required plywood protection of all window frames. We covered all other open areas with tarps or particle board.
The next year, 2011, we built more walls and installed more window frames. We also hired Gimme Shelter Construction to assemble the core of our two-story masonry fireplace. In 2012, we pierced the ceiling to allow Kim to finish the chimney. After Kim accomplished his task, our American Hydrotech materials were delivered, enabling a late May roofing installation.

We started 2013 with the installation of the first floor decking, more cordwood infill, and window frame construction and installation. We decided not to lay cordwood for the third level, but instead to finish with 2-by-6-inch stud walls and cedar shake siding. We connected the fireplace heat exchanger to the lower level radiant heat and operated it through that winter.
In 2014, we both retired, and we completed the south cordwood walls and finished laying most of the floor decking. Inside, we sanded, cleaned, stained, and varnished the posts, beams, and ceilings. In between window and door installation, we worked on internal and external caulking as well as window trimming and finishing. After the weather became too cold, we were able to move inside the cordwood building to apply stucco to both levels of the fireplace. We began to plan and construct the master bedroom, bath, and kitchen areas; at that point, plumbing, electric, flooring, tiles, fixtures, appliances, cabinets, and some trim needed to be installed and finished. We finally moved into the home in the summer of 2015.
This has been a journey of joy, discovery, and perseverance. Though our building process was lengthy, we believe it allowed us time to make better decisions and ensure that our cordwood house was exactly what we dreamed of all those years before.


