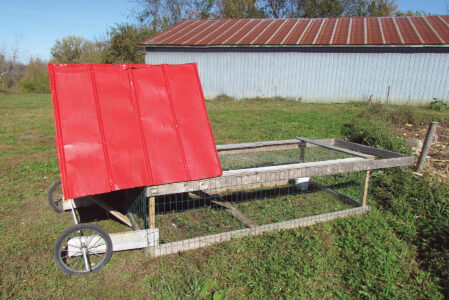
Pasture your poultry safely with these chicken tractor plans. This chicken tractor DIY project comes together quickly and is easy for one person to move.
My homemade chicken tractor is simple to build, easy to move, and will make your life a lot easier. I used a lot of leftover pieces from previous projects, including old tin and lawnmower wheels. It took about half a day to build, but a lot of that was me trying to figure out a design that would be easy for me and my wife to easily move. This chicken tractor will hold between four and six laying hens, depending on breed size, and it measures 4-by-8-by-2 feet for the run and 4-by-4-by-4 feet for the coop. I built it in an afternoon, and I’ve enjoyed free-range eggs and pastured poultry ever since.
Chicken Tractor Plans
Tools
Materials
- 8-foot 2-by-4s (8)
- 8-foot 2-by-6 (1)
- 10-foot 2-by-6 (2)
- 4-by-8-foot chicken wire
- 4-by-8-foot 1/2-inch plywood (2 sheets)
- 5-foot-long threaded rod (diameter needs to fit bushings tightly)
- 2 wheels
- Metal sheets for roof
- Staples (1 box)
- 2-1/2 inch screws (1 box)
- Nuts and washers for threaded rod
- Small hinges
- A door latch or lock (for coop)
Homemade Chicken Tractor: DIY Instructions
- Cut four 8-foot 2-by-4s to 45 inches. These will connect your frame from side to side.
- Rip a 2-by-4 in half, making two 2-by-2s. Cut one 2-by-2 into four 2-foot pieces. These will act as vertical supports, holding your frame together at each corner.
- Build frames for the coop sides using 8-foot 2-by-4s and 2-foot 2-by-2s from Step 2. Join the frames with 45-inch 2-by-4s at top and bottom. You should have a box with the 8-foot sections on top. Offset the top sections by 21 inches to create space for your coop.
- Attach the 10-foot 2-by-4s to the underside of the top frame to create handles for moving the tractor.
- Cut your wire pieces to fully enclose the coop’s sides, stapling every 6 inches or so. This will keep the predators out and chickens in.
- Enclose the top and make a cover for the bottom so you have a closed-in 4-by-8-foot box. Don’t enclose the 21-inch opening, and leave the last 3 inches unstapled for the coop.
- Cut one plywood sheet in half to make a 4-by-4-foot piece. Screw in place where you left an opening in the wire, folding up that last 3 inches of wire that you left loose. The coop’s floor will hang 2 feet over the end, which will make it much easier to move.
- Cut a 1-by-2-foot hole in plywood to give chickens access to the lower section.
- Cut two triangular end pieces from the remaining plywood sheet to 4 feet wide and 3 feet tall. Attach these together with two 2-by-4s cut to 4 feet. Your 2-by-4s will set about 3 inches in on each side, so you’ll have a flush surface to mount the roof to later.
- Fasten your framed structure to the base of the coop, screwing in from the bottom and the sides.
- Cut your leftover 2-by-2 into two 4-foot-long pieces. Screw one in at the very top for a frame piece, and the other about 12 to 18 inches down. This will be a roost, so adjust according to the size of your birds.
- Cut some old tin into sections long enough to cover the whole roof, bending at the top and fastening with roof screws.
- Use a jigsaw to cut an opening into the end for your access. (I cut mine big enough to put a feeder inside.) Fasten with hinges and a locking device. Now your coop on your chicken tractor is done!
- Cut your 2-by-6 into two 3-foot pieces, attaching to the frame beneath the coop.
- Measure your wheel-mount so the wheel height keeps the two ends of the run level.
- Drill holes for threaded rod into each side, running threaded rod through and mounting the wheels. Fasten down with fasteners. Now you can easily move your chicken tractor!


