Broken and leaking garden hoses can be a source of frustration unless you know a few tricks to make garden hose hole repair quicker and easier.
Unavoidably, garden hoses spring leaks or get run over and cut by the mower. No need to be in dread of having to fix hoses. We have figured out a system that works smoothly, and gets you and the hose back into action quickly. We put our broken hoses next to the cold-frames by the greenhouse in a sunny spot. We wait for the right combination of desperation (need for another good hose), spare time, and “ideal hose-mending weather” — when it is disgustingly hot, hoses become more flexible and easier to repair.
Garden Hose Hole Repair Process
Here’s our step-by-step “how to fix a hose” process.
Gather the Kit
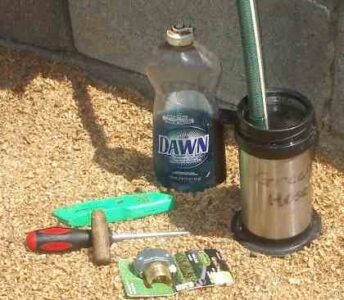
Hose and fittings, sharp knife, Philips screwdriver, wooden dowel, dish soap and unbreakable insulated mug. The wooden dowel should be tapered to fit into the end of a hose and stretch it out.
Buy the heavy-duty all-metal hose repair fittings, not the plastic ones. We find that the threads on the plastic repair fittings wear out, leading to leaks, and the ends sometimes just break off. The metal ones save frustration and are well worth the extra cost. If they last longer than the hose, you can simply remove them onto another hose needing repair.
If you are replacing an end fitting, be sure to get the right kind, so-called female or male hose fitting (with the threads on the inside or the outside.) If you are splicing in the middle of a length of hose, get a connector with two clamp pieces and a double-ended insert.
You can, if you like, permanently join two previously separate hoses to make one good hose, using a connector, or divide one broken hose into two shorter hoses using end menders. We sometimes do this if we are running short of spare repair fittings, just to get back in business. Also note that short lengths that fasten onto faucets are a handy thing to have, for filling buckets and cans, so if the break is near the female end, you might just make one very short hose and one almost-full-length hose.
Remove Old Fittings
Remove any old fittings from the hose. If you want to save the insert for re-use, slice the hose vertically over the insert, but make sure you don’t cut a channel in the plastic, because that will create a leak. Sometimes it is easier to just make a fresh cut below the fitting.
Fashion a New End
The next task is to make a clean square-cut end on the hose with a utility knife, to ensure the fitting will be snug and not leaky.
Boil some water and fill an unbreakable insulated mug. Put the hose end into the hot water to soften. Prop the mug against something solid and before you look away, make sure the arrangement won’t tip over.
While the hose is softening in the water, loosen the clamp screws on the new fitting. You don’t have to take the screws all the way out. You can just loosen them enough to slide the clamp on the hose and up beyond the end you are working on.
Also while the hose is softening, lubricate the end of the repair fitting with dish soap. (Honestly, this makes a lot of difference.)

Dowel stretching softened hose end.
Take the hose end out of the water and push the wooden dowel in the hose end to widen it. Some hoses are more flexible than others and don’t need this step.

Push the hose fully onto the fitting.
Pull out the dowel and push in the soaped-up fitting. Push firmly until the fitting is fully seated. With female fittings it can help to use a male fitting in the one you are pushing on. Next, push the clamp into place over the insert and fasten the screws up tight.
You might test the hose next, to look for any other problems, then drain and coil it. Or you might just coil it. Loosely fasten the ends of the coiled hose, to stop mud-dauber wasps from setting up home, and to prevent the washer dropping out.
Bonus Tip
If you have a stockpile of old plastic repair clamps, don’t throw them all away. If a hose has a pinhole leak, you can fix it by wrapping a piece of bicycle inner tube around the hose, then fastening just one of the clamps over the area.
Pam Dawling works in the vegetable gardens at Twin Oaks Community in central Virginia. She often presents workshops at MEN Fairs. Pam also writes for Growing for Market magazine. Her book, Sustainable Market Farming: Intensive Vegetable Production on a Few Acres, is available at www.SustainableMarketFarming.com, Pam’s blog is on her website and also on Facebook.
All MOTHER EARTH NEWS community bloggers have agreed to follow our Blogging Guidelines, and they are responsible for the accuracy of their posts. To learn more about the author of this post, click on their byline link at the top of the page.


