Oyster mushroom cultivation can be quite rewarding. Here, you will learn everything you need to know to grow oyster mushrooms, from starting your own grain spawn and setting up your mushroom growing space to preparing your substrate and when to harvest oyster mushrooms.
I first began my journey into the fungi kingdom about a decade ago. It was a foggy morning in Michigan, and driving down the road, I saw a sign for a mushroom foraging class at a Bald Mountain State Recreation Area, and the class was starting in a few minutes. I was intrigued and scrambled in to join the assembling group at the edge of the forest — there was an air of excitement as our instructor, with a wealth of mushroom identification skills, gave us an overview of some of the mushrooms we could hope to find that afternoon — hen of the woods, oysters, lions mane and chanterelle to name a few. We spent several hours exploring and found quite a few mushrooms, some edible and most not. Like many before me, I walked away from the class that day hopelessly in love with mushrooms and petrified of foraging for the wrong thing.
I’m from a family of people who love everything about making great food, and all of us have a habit of chasing down or growing interesting ingredients when we hear about an intriguing flavor we haven’t tried (I once even sent a self addressed stamped envelope to someone who’s family has kept a sourdough starter going since it was carried along the Oregon trail in 1847 — they’re still circulating that culture and I highly recommend it http://carlsfriends.net/ ) so the world of gourmet mushrooms had a natural magnetic pull for me.
After the foraging class, I spent several years reading and researching, trying to understand how mushrooms were grown — not just from a supermarket kit that you spray dutifully and harvest at the right moment, but how to truly grow mushrooms from start to finish. It was surprisingly difficult to figure out where to start, but when I finally had what felt like enough information and gave it a try, I was astonished at how easy it was to grow mushrooms.

There are many, many methods and just as many opinions on which way is the right way to grow mushrooms — many people will tell you that there’s no point in trying to grow mushrooms without a ton of special equipment and fiddly techniques, but I’ve found that this couldn’t be further from the truth. While there are certainly some more complicated species of mushrooms that take some extra elbow grease to grow, there are many varieties of absolutely wonderful gourmet mushrooms that you can grow easily at home without any special equipment.
Some of my favorite mushrooms to grow, and one of the most forgiving ones for beginners to start with, are the amazing mushrooms found in the oyster mushroom family. You’ll rarely find them in grocery stores but frequently see them at farmers’ markets and often celebrated in the culinary world.
Oyster Mushrooms fetch an average of $10/pound at retail, have a huge range of flavors, and can be dehydrated and stored for long-term use. Pink Oyster Mushrooms taste almost exactly like bacon, while Blue Oyster Mushrooms land somewhere between chicken and crab and have a buttery note to them. King Oyster Mushrooms have thick stalks that can be sliced and seared like scallops, Black Pearl Oysters have a sweet, slightly peppery taste, and Golden Oyster Mushrooms have a nutty flavor reminiscent of cashews. If you love to cook, they are a phenomenal addition to any foodie’s garden, and if you’re a market gardener, they can be quite a profitable endeavor.
So, without any further ado, here is my guide to how to grow oyster mushrooms at home without any special equipment.
So, where to start when you’re ready to grow oyster mushrooms?
You don’t need much to begin your oyster mushroom growing journey. I’ll explain how to grow them in a bucket, but you can always substitute whatever container you have handy — laundry baskets with holes, ice cream tubs, and even trash bags with holes made using a hole punch can work great for growing oyster mushrooms.
A safety note before you start oyster mushroom cultivation:
For any food production projects, it’s generally recommended that you use food-grade plastic containers for oyster mushroom cultivation if you’re using a container made of plastic. Wooden barrels and woven baskets can be used, too. We love finding eco-friendly options for our growing containers and reuse them many times over whenever possible — just make sure to wipe them down thoroughly with rubbing alcohol or peroxide before beginning to eliminate any lingering fungi or bacteria that might interfere with your growing efforts.
Before mushrooms comes grain spawn
To begin oyster mushroom cultivation, you need to make something called grain spawn. While it sounds like something out of a sci-fi novel, it’s actually one of the oldest and most useful tools you can use to grow many varieties of mushrooms. The idea is that you take grain (we’ll be using rice, but people also often use birdseed, corn, rye, or wheat berries — each ), sterilize and hydrate that grain, and then add mushroom culture to that once it’s cooled so that over the course of several weeks you’ll colonize the rice with fluffy white mycelium and then use the resulting mycelium covered grain as a sort of mushroom seed.
How to make grain spawn
You’ll need:
- Brown rice
- A quart or gallon-sized freezer bag
- Paper bandage tape (they always sell it right next to the bandaids)
Cook enough rice to fill your freezer bag halfway. Cook it for about 10 minutes less than the rice instructions say, so it’s a bit on the firm/dry side of things. While it’s still hot, put it in the freezer bag, squeeze out the air, zip it shut, and let it cool. Once it’s completely cool, add 1 ml of liquid mushroom culture to the bag. Then, instead of zipping the bag shut, you’ll use a bit of paper bandage tape to tape it closed so it creates a filter, allowing some airflow in and out. After 2-3 weeks, your rice will be covered with fluffy white stuff called Mycelium. Mycelium is the roots and underground network of the mushroom. Once your rice is completely covered with mycelium, it’s officially “Grain Spawn” and it’s ready to use
Once your grain spawn is ready, you’ll prepare your mushroom growing bucket. We’ll do the instructions here referring to buckets, but feel free to adapt this to whatever other container you use when you grow oyster mushrooms.
Prepare your oyster mushroom growing bucket

First, you’ll need to put a few holes in your bucket. I like to use a �…� inch drill bit and put holes about 4 inches apart in a zig-zag pattern. I usually go all the way around the bucket with this. The mushrooms will ultimately grow out of some holes and use the others for airflow. If you’re using a container with thinner material, you may be able to cut holes or use a hole punch. A screwdriver heated over a flame works quickly on an ice cream tub. (Any of that should be done with adult supervision. Be careful!)
Pasteurize your straw before you grow oyster mushrooms
Take enough straw to fill your bucket and put it in a pot or heat-resistant container that doesn’t have holes. Carefully pour boiling water over the top of the straw until it’s been thoroughly covered with hot water, then put a lid on it and leave it alone until it’s cooled to room temperature.
Now it’s time to put everything together by layering your bucket!
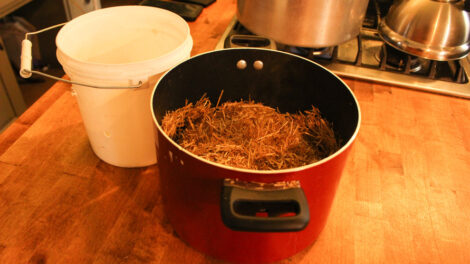
- You’ll want to wipe down your bucket thoroughly with isopropyl alcohol (70% is best; higher is flammable), or you can use hydrogen peroxide.
- Drain the water out of your now-cooled straw and put a layer of straw about 2 inches deep in the bottom of your mushroom bucket.
- Take a chunk of the grain spawn you prepared and crumble it evenly over the layer of straw.
- It’s not necessary to be completely exact, but I’ve found that I divide my grain spawn into about 8 equal chunks and use one chunk for each layer of straw.
- Then, add another layer of straw an inch or two deep and another layer of crumbled grain spawn. Repeat this process until the bucket is full, ending with a layer of straw on top.
Let your bucket colonize in order to grow oyster mushrooms
Put your lid on top and close the bucket. If your bucket doesn’t “click” shut, tape it. If you don’t have a lid, tape a piece of trash bag over it or something. Use paper bandage tape to cover each of the holes drilled in your bucket, then set it aside to colonize undisturbed for 2-3 weeks. The ideal oyster mushroom growing temperature for the colonization phase usually ranges between 70-75 degrees Fahrenheit. The colonization phase doesn’t require any particular humidity or light control, so your buckets can just be set out of the way somewhere where the general temp ranges near 70-75 degrees. There’s some wiggle room on that, so don’t despair if you don’t have a spot that’s exactly 70-75 degrees when you grow oyster mushrooms; just get as close as you can. Some other kinds of mushrooms require more precision for their colonization and fruiting temps, but oyster mushrooms are a bit more forgiving than most.
The fruiting phase of oyster mushroom cultivation
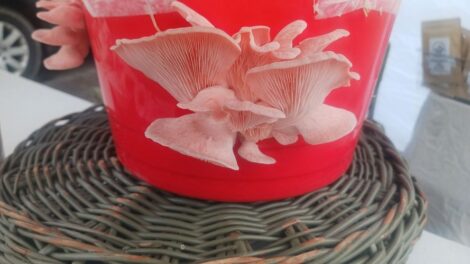
When your mushrooms are ready to begin fruiting, you’ll notice that some of the holes have tiny baby mushroom pins trying to push through the tape. When this begins to happen, peel the tape off those holes (leave the holes that don’t have mushroom pins taped), and then you just need to mist the outside of the bucket with a spray bottle and fan it a bit each day. And by fan it, I mean take a piece of cardboard or a magazine or something and fan it enough to give it a bit of breeze for a few seconds.
The idea in oyster mushroom cultivation is to simulate a gentle rainstorm-type experience for a moment — fanning them after misting them causes the water to evaporate a bit, which triggers growth in the mushrooms.) If your mushrooms seem too dry, try setting a damp towel on top of your bucket.

For the fruiting phase, the ideal oyster mushroom growing temperature range averages between 50-80 degrees; see below for specific fruiting temperatures per variety of oyster mushrooms:
Oyster Mushroom Variety Suggested Fruiting Temperature:
- Pink Oyster Mushroom 70-85°F
- Black Pearl Oyster Mushroom 55-70°F (can handle warmer but best harvest in this range)
- Blue Oyster Mushroom 50-80°F (will survive up to 95°F)
- King Oyster Mushroom 65-75°F
- Golden Oyster Mushroom 75-90°F
It’s important to note that there is some wiggle room on all of these temperatures when you grow oyster mushrooms. Generally, cooler temperatures yield brighter mushroom colors, while warmer temps yield larger mushrooms, but following the ideal temp range for any given variety will give you the best possible harvest.
When to harvest Oyster Mushrooms
After about a week, your mushrooms will be almost ready to pick. They grow quickly during the fruiting phase, which is fascinating to watch — you’ll know they’re ready to harvest when the edges of the cap are still just barely turned under and beginning to flatten out. You’ll want to harvest them right around this time – waiting longer gives them a chance to drop spores, which can be messy if not contained. To harvest your mushrooms, take a knife and slice them off the outside of your bucket. Use paper bandage tape to cover the holes back up.
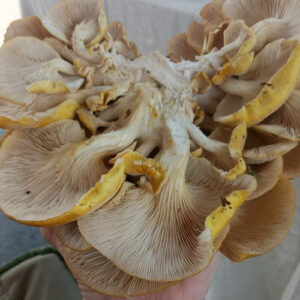
What is a Flush of Mushrooms? Getting multiple mushroom harvests.
Each round of harvest is called a flush. You’ll usually get 2 to 3 flushes out of each bucket of when you grow oyster mushrooms. Your mushrooms won’t grow out of every single hole on the bucket – they’ll pick a few to grow out of, and the rest they’ll leave as air holes. After you’ve harvested all of the mushrooms growing in a flush (usually, they’re all ready about the same time), you’ll want to take the bucket and soak it in water overnight (if the bucket is small enough, you could put it inside of a pot of water and weigh it down. A clean sink or large bin works well for bigger buckets. In the morning, drain out any excess water, put the lid on, and tape up any holes that are no longer taped. In a few days, you’ll have new mushroom pins growing, and you’ll be able to repeat the fruiting process with your second flush. Do this until the bucket seems to be depleted and isn’t producing anymore. When it’s done, you can dump what’s left of the contents of the bucket in your compost pile, where you may see a few surprise mushrooms grow over time, and your compost will be all the richer for it.
A tip about humidity & fresh air exchange when you grow oyster mushrooms:
If it seems as though they might be getting too dry, I’ve seen many home growers successfully make a sort of humidity tent to put over their buckets to help maintain moisture. Using an unscented trash bag with air holes popped into it can be effective when you grow oyster mushrooms, so long as you don’t forget to fan them every so often. If mushrooms don’t get enough air while fruiting, they’ll become spindly and weird looking.
After you grow oyster mushrooms, it’s time to enjoy your harvest!
When you grow oyster mushrooms, there are many ways to enjoy your harvest. Uncooked, they are bland and metallic — I would not recommend eating them raw. Cooked, however, their many layers of flavor come to life. Each variety of oyster mushroom has a distinct flavor of its own — pink oyster mushrooms taste like bacon, golden oysters are reminiscent of cashews, and black pearl oyster mushrooms have a subtle pepperiness without being spicy. Blue oyster mushrooms are halfway between chicken and crab in both flavor and texture, and king oyster mushrooms have a savory umami flavor and stalks that can be cut into slices and seared like scallops. They dehydrate beautifully if you can’t cook your whole harvest right away. Dried oyster mushrooms can be ground up and used as a seasoning to sprinkle into soups, sautés, and roasts whenever you’d like to add a splash of flavor. Growing oyster mushrooms at home is a rewarding process that requires very little in the way of supplies and yields a wonderful harvest of gourmet mushrooms that can be enjoyed throughout the year.
