Learn about growing hops at home for how and where to grow them, including the history of hops.
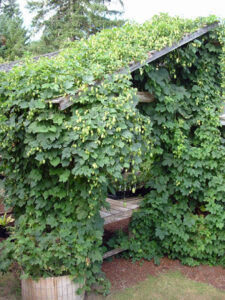
My interest in growing hops started back in 1984 when we were in the midst of remodeling our restaurant in Alsea, Ore. The grounds around the building were suffering from complete neglect. After we got rid of all the broken appliances covered with blackberries and created a kitchen garden on one side of the building, we removed overgrown yew bushes and sod to expand our herb collection on the opposite side. We constructed raised beds in an octagonal shape and built a gazebo in the middle as a center piece. To provide shade and aesthetics, we planted hops all the way around it.
Hops are perennial, which means they provide plenty of shade in the summer and then disappear in winter to allow light back in and expose the supporting architecture, thereby creating an ever-changing visual. After we sold our restaurant in 1989, we began growing hops organically at our new business, The Thyme Garden Herb Company, strictly for rhizomes to sell to our customers to start their own hops.

A Short History of Hops
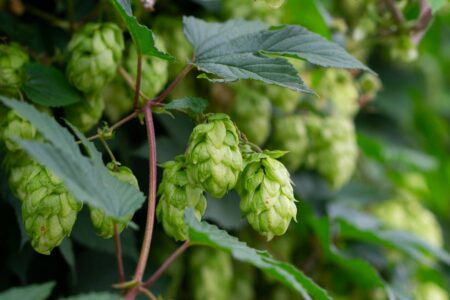
Cultivation of hops in the Hallertau region of Germany in 736 may be the first known use of hops for brewing. Hop cones replaced the use of gruit, a mixture of medieval bittering herbs and flowers, including costmary or alecost, chamomile, yarrow, dandelion, mugwort and horehound (horehound is German for “mountain hops”). Some of these herbs have been proven to be good preservatives. Only the female hop flowers, cones or strobiles are used in brewing. They are added to the batch at different stages to add flavor, aroma and bittering imparted by the acids in the cones.
Alpha and Beta Acids in Hops Brewing
There are two main types of acids in the hop cone, alpha and beta. Alpha acids add the bittering to beer and have a mild antibiotic and antibacterial effect against certain bacteria. Beta acids add aroma and are added at the end of brewing to preserve the volatile oils. Bittering hops have high alpha, aroma hops have low alpha and high beta. Noble hops used to brew pilsners have an equal amount of alpha and beta acids. Examples of nobles would be Hallertauer, Saaz, Tettnanger and Spalt. Saaz can be hard to find so I recommend Sterling, a cross between Saaz and Mt.Hood as a sub with an alpha/beta ratio that is close to equal.
Another group of hops that has distinguished the American craft beer and its Pale Ale’s and IPA’s are the “Three C’s”: Cascade, Centennial and Columbus (also known as Tomahawk or Zeus.) They are combined in varying amounts to add citrusy, fruity and earthy flavors with a balance of bitterness.
Get Started Growing Your Own Hops
As I mentioned, only the female plant is grown for beer brewing. You are insured, yet not 100 percent guaranteed, to get a female plant by taking cuttings from the underground runners a female plant produces and start with those. I was told by a professor of genetic research at the Oregon State Hop research facility here in Oregon that occasionally the female will produce a male rhizome or sometimes the whole female plant will actually become a male. Bummer! Thank goodness that’s pretty rare.
To get started growing your own hops you’ll want to purchase some hop rhizomes. Typically they will be about a 6-inch cutting from a runner with two rings of growth buds that will produce the vines, or bines, as they are called. If you have the end of a runner, it might only have one ring but more buds. Neither has roots but is all you need to start a plant. They should be at least twice the size of a pencil in diameter. Generally, that’s all that is sold by other retailers.
When available, we offer extra large rhizomes that are 1 inch or larger in diameter and 25 buds or more. To cut down the years it will take to harvest cones, we also offer rooted rhizomes. These are the regular rhizomes planted in our hop nursery and grown for an extra year so they produce a root system and a crown loaded with buds. And if you want an even faster start, we sometimes have extra-large rooted, which are the rooted ones allowed to grow a second year, making it a 3-year-old rhizome. These things are almost scary! Watch for those on Ebay.
Storing and Planting Hops Rhizomes
When you get your rhizomes in the mail you can store them in the refrigerator for period of time until you are ready to plant. They should be planted by early May, if possible. Keep in mind the longer they sit in a plastic bag in the refrigerator, the more their vitality depreciates. Hops grow best above the 54th parallel. Below that will be experimental. They need the cold winter dormancy to stay happy. We’ve had customer’s in Arizona at higher elevations where it gets cold in winter have success. We have more first-hand growing experiences from customers around the country on our website that is helpful, informative and sometimes funny. Hops prefer full sun and good drainage with sandy soil, if possible, and a soil pH of 6 to 7.5.
Spacing when planting varies. We use rows 7 feet apart and hops 3-1/2 feet apart in rows, because we are growing them for rhizomes. For cone production, I would go 7 feet apart in the rows.
Prep your soil by digging a hole about 1 foot deep and 1-1/2 feet wide — bigger if you feel energetic. Mix aged compost into the soil you removed and some in the hole. Replace the soil. You can either plant them horizontally or vertically. I prefer vertical. Because they come with two growth rings, the advantage of planting them vertically is so that if the top buds get destroyed, the bottom ones can take over. Either way, plant them with the buds about 1-1/2 inches under the surface. (A little less if you are going to top dress with mulch to conserve moisture and suppress weeds.) Keep them watered the first year so they can produce a good root system.
Hops in Their Second Year
The following year, your hops won’t require much watering because they will have gone deep with their roots. The plants will need to grow up something. Happy hops will grow 20-25 feet tall. The most common approach is to use twine for them to wind around (keep in mind they naturally twirl clockwise!) Then, in fall, when they turn yellow and die back, you can cut it all down and discard it. We have them growing on the fence that lines our driveway along our herb garden. The fence is only six feet high, so it takes a little effort to train them to grow horizontally and it’s also a bit of a pain to get the dead vines off the fence. I say a bit of a pain, because I don’t do it — Bethany does.
You’ll know when it’s time to harvest the cones when they are a light lime green, have a papery texture and when broken open are full of yellow pollen that smells soooo good! Let’s have a brew!


