Check out these easy-to-follow horizontal hive plans to get your started in the world of beekeeping. We’ll show you step-by-step how to build a beehive from scratch.
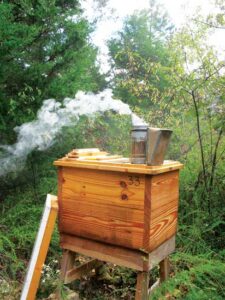
The Layens hive is the original horizontal hive with extra-deep frames, invented in the 19th century by Georges de Layens. More than 1 million hives of this model are in use today, and it’s the hive that I (and my bees) prefer.
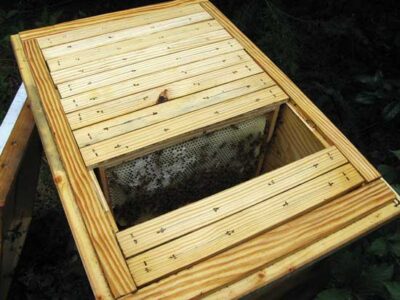
This style of hive is ideal for successful overwintering and rapid spring colony buildup, even in cold climates. This model features 1-1/2-inch walls, which will protect your bees from summer heat and winter cold. This version accepts 14 Layens frames (which are equivalent to 18 Langstroth deep frames) and holds up to 45 pounds of surplus honey. If you live in an area with a more abundant honey flow, simply make the box longer by 19/16 inches for each additional frame you desire. Depending on the area and your management choices, Layens hives can consist of anywhere from 12 to 30 frames.

Building Instructions
The prospect of building a hive may be daunting if you’ve never built one. Let’s demystify it: A hive is just a rectangular box with a cover. You can build one with a handsaw, a hammer, and a chisel. For higher productivity, you can use a table saw and an electric drill. A small router and an air compressor with a narrow-crown staple gun will further speed things up. You can expect to spend about a day building your Layens hive.
You can even construct hives without your own tools, workshop space, or woodworking skills. I once organized a hive-building party for 17 people who brought their own tools and built 33 hives and swarm traps in a day. Even those without prior woodworking experience picked up useful skills and went home with their own equipment. Now, let’s take a look at how you can build your own.
Materials
- 1 untreated 2-by-10 board, 14 feet long
- 1 untreated 1-by-8 board, 8 feet long
- 1/4-inch untreated plywood sheathing, at least 26-5/8 by 18-7/16 inches
- Sixteen 3-inch deck screws
- Wood glue
- Fifty 1-1/2-inch staples or 1-1/4-inch deck screws or nails
- Twenty 1-inch staples or 1-1/4-inch nails
- About fifty 3/8-inch T50 staples
- 20-by-30-inch aluminum flashing
- 1-by-20-inch steel or aluminum insect screen
- Wide paintbrush
- 1 pint exterior acrylic primer/sealer
- 1 pint light-colored exterior acrylic paint
Tools
- Tape measure
- Sliding miter saw
- Table saw
- Dado set (optional)
- Router with 1/4-inch and 1/2-inch straight bits and 45-degree chamfer bit
- Right-angle clamps (optional)
- Carpenter’s square
- Cordless drill with a 1/2-inch drill bit
- Narrow crown staple gun
- T50 staple gun
- Utility knife
- Metal shears
- Cut the 2-by-10 board into four pieces at 21-7/8 inches, and four pieces at 161-1/16 inches. Rip all eight boards to 9-1/8 inches wide. These will make up the walls of the hive.
![]()
- Prepare the tongue-and-groove joint using either a dado set and table saw or a router with a 1/2-inch router bit to create a 1/2-by-1/2-inch tongue along one side of two of the long boards and two of the short boards. Cut a 1/2-by-1/2-inch groove along one side of the other two matching long boards and two short boards.
![]()
- Cut a rabbet that’s 3/8 by 7/16 inch along one edge of the long grooved boards on the side opposite the groove. These will become the frame rests.
![]()
- On the long boards with a tongue, cut a rabbet that’s 5/16 by 13/16 inch on the side opposite the tongue.
![]()
- On the short boards with a tongue, cut a 13/16-by-13/16-inch rabbet, stopping 1-3/16 inches shy of each butt end.
![]()
- Cut two entrances in one of the long boards with a tongue. Each entrance should be a slot 4 inches wide by 1/2 inch tall. Place the slots 1-1/4 inches from the bottom edge of the board and 2 inches from each end. I use a router with a 1/2-inch straight bit for this. (You can also drill a hole and use a jigsaw instead.)
![]()
- Now, you’re ready to assemble the hive box. Position the grooved boards on a flat surface. The long boards go between the short boards with the grooves facing up and the frame-rest rabbets on the long boards facing toward the inside of the box. Check to make sure everything is square, drill two pilot holes per corner, and then attach the sides using 3-inch deck screws.
![]()
- Apply wood glue to the grooves of the assembled box and the tongues of the remaining boards, connect the boards, and assemble the second tier with 3-inch deck screws, drilling two pilot holes per corner.
![]()
- Cut two 23-3/8-inch pieces from the 1-by-8 board. Cut a 1/4-by-1/4-inch tongue-and-groove joint, and glue the boards together. Insert them into the rabbet on the hive body and use 1-1/2-inch staples (or nails or screws) to fix it into place.
![]()
- Rip the remaining piece of 1-by-8 board into two planks that are 2-1/2 inches wide, and then cut them into four pieces — two pieces that are 26-5/8 inches long and another two that are 16-15/16 inches long. Put the shorter planks between the long planks, check that everything is square, and then connect them with 1-1/2-inch staples or screws, forming a frame.
![]()
- Cut a piece of 1/4-inch plywood to 26-5/8 by 187/16 inches, and attach it to the frame with 1-inch staples or nails.
![]()
- Cut a piece of aluminum flashing to 20 by 28-5/8 inches. Lay it on a flat surface, center the lid on it, lightly score the perimeter with a utility knife, cut the notches on all four corners, and then fold and staple the flashing into place with 3/8-inch staples.
![]()
- Rip what remains of the 1-by-8 board into two strips that are 15/16 inch wide. Cut them into four pieces: two pieces that are 26-3/8 inches long and another two that are 16-11/16 inches long. Take 1/8 inch off one edge of each plank using a 45-degree chamfer bit (to form the drip edge), and then nail the boards to the hive body 1/2 inch from the top edge of the box with the drip edge facing up. This rim will support the top.
![]()
- Now, it’s time to add some ventilation. Drill four 1/2-inch holes on each short side of the top, making sure the holes are sloped upward to prevent rainwater from entering the hive. If your climate has very hot summers, drill a couple more holes on each side. On the inside of the top, cover the holes with aluminum or steel insect screen, and staple it into place with 3/8-inch staples. Make a 1/2-by-3-inch slot in the center of the bottom, cover it with screen on the inside, and staple the screen into place. Paint the outside of your hive, add some Layens frames (you can find instructions to build them or buy them on my website, and then you’re done.
![]()
Your Layens hive is now ready for some bees. The top bars of the frames create a nice ceiling, which retains warmth inside the hive and minimizes disturbance during inspections. The space above the frames is ventilated and can be filled with insulation for winter. Thick walls and a deep and relatively narrow nest mimic a tree hollow.

The best part, of course, comes during the actual use. The Layens hive is a pleasure to work with, and with the plentiful reserves stored in the deep frames, the bees overwinter great, build up strongly in spring without any feeding, and do excellent throughout the season. This hive was designed for easy management, requiring only two hive visits per year, and you can even make it using salvaged materials, which you can learn more about in another article of mine, “Build a Bee Hive from Reclaimed Materials.“


