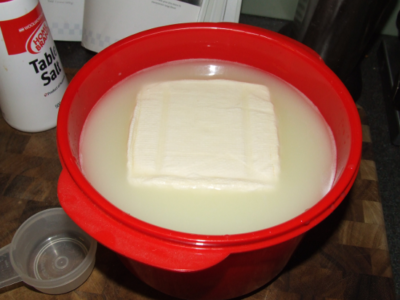
Wade into the world of cheesemaking by learning how to make feta style cheese. With a pressing of only 4 hours, this cheese is an excellent place to start.
My first taste of real cheese was when I was a teenager. I’d often visit my friend George, whose parents were of Greek origin, and they would inevitably invite me to stay for lunch.
At the meal they would serve marinated Kalamata olives, fresh flat bread, preserved salami, and best of all, freshly made Feta. The memory is still vividly etched into my brain and I can still taste the sharp and saltiness of the Feta. It was a taste experience that I shall never forget.

When I first began to make cheese at home, Feta was the first cheese I decided to try! Feta style cheese is so easy to make, and only needs 4 litres (1 gal) of milk instead of the normal 8 litres (2 gallons) that I use for making hard cheese. It is a great cheese with which to learn the basics of semi-hard cheese making. With minimal stirring after cutting the curd, and a pressing of only 4 hours, what is not to like about this cheese?
So allow me to show you how to make this cheese in a video tutorial that I’ve made for one of my personal blogs. And yes, that’s my real voice.

Feta-Style Cheese Recipe
You can make this recipe with goat’s and sheep’s milk as per tradition; however if you do, leave out the lipase.
Ingredients:
• 4 litres (1 gallon) full cream cow’s milk
• 1/4 tsp of lipase diluted in 60ml (1/4 cup) of non-chlorinated water
• 1/8 tsp of direct set Mesophilic culture
• 1/4 tsp (2.5 ml) rennet diluted in 1/4 cup (60 ml) of non-chlorinated water
• 1/4 tsp (2.5 ml) calcium chloride diluted in 1/4 cup (60 ml) of non-chlorinated water (if milk is homogenised)
Brine:
Method
1. Sterilise your utensils and leave to air dry
2. Add the milk to the large pot. Stir in the lipase solution.
3. Heat milk to 30 degrees C (86 degrees F), then add the starter culture. Cover for 1 hour.
4. Maintaining the target temperature of 30 degrees C (86 degrees F), add the rennet solution and stir, top to bottom, for 1 minute. Cover and allow to coagulate for 1 hour.
5. Check for a clean break, then using your curd knife, cut curd into 1.25 cm (1/2 inch) cubes. Rest the curds for 10 minutes at the target temperature.
6. Stir the curds for 20 minutes, during which you will notice that they will shrink and expel whey.
7. Pour the curds and whey into a cheesecloth lined colander, and allow to drain for 30 minutes. Dividing the curds into two equal portions, ladle into 2 square cheese moulds lined with cheesecloth.
8. Fold over excess cheesecloth and stack one mould on top of the other. Place a 2 litre (2 qt.) milk carton filled with water on top of the second mould, which serves as the weight. It doesn’t need much pressure to form the block of Feta.
9. After two hours have elapsed, the blocks will have shrunk enough to place both together in a single mould forming one block. Cover again with the excess cheesecloth and press with the 2 litre milk carton for a further 2 hours.
10. Once pressed, add the cheese to the fully saturated brine. Leave in the brine for two days in the fridge. At the end of the first day, flip the cheese over. Wait until the end of the second day, then enjoy the finished Feta.
11. This cheese is just so simple to make and it took me three hours from start to pressing, then about another 15 minutes making the brine.
12. As you consume this cheese you can transfer to a smaller container submerged in brine to make more space in your fridge.
The finished product is a firm, crumbly, yet creamy feta that can be stored for at least 4 months in this manner. It is great crumbled on top of pizza or cubed into a Greek salad with lots of home preserved black olives!
Deliciously simple and an easy cheese with which to start your curd nerd journey!
Gavin Webber is a self-confessed curd nerd who blogs, podcasts, and produces cheese making videos at Little Green Cheese. You can find him in his kitchen most weekends making cheese, or you can read all of Gavin’s posts here.
All MOTHER EARTH NEWS community bloggers have agreed to follow our Blogging Best Practices, and they are responsible for the accuracy of their posts. To learn more about the author of this post, click on the byline link at the top of the page.


