My excuse to travel to India in 1982 was that I was studying Transcendental Meditation with the Maharishi Mahesh Yogi. I was also studying Indian culture, so different from American culture.
One of the street foods I enjoyed most in India was chai. The drink mixture varied from vendor to vendor and could be as simple as tea with pepper and ginger, or as complicated as tea with five or six spices. Indian chai was usually made with buffalo milk, which is creamier than cow milk.
When I got home to North America, I was unable to find chai. Years passed before it was available in cosmopolitan coffeehouses. Although it’s ubiquitous today, American chai isn’t authentic. It’s often made with a syrup and is tremendously sweet compared with real Indian chai, which is only slightly sweet.
To make my homemade chai authentic, I asked my Indian friends to share their recipes. Before you read my instructions, though, I must tell you that no single exact “recipe” exists in India. When I was taught to make chai by my Indian friends, they related ingredient amounts as a “handful,” a “pinch,” “some,” or “use your common sense.”
The following recipe is as close as I can get to the original taste I remember from my time in India. Use these instructions as a starting point and develop your own recipe. Almond milk makes a less creamy tea, while half-and-half produces a creamier drink. For a spicy version of chai, use a mortar and pestle to break up a couple of star anise petals, a stick of cinnamon, a teaspoon of whole cloves, a teaspoon of whole cardamom, and a quick grating of nutmeg; add these spices to the boiling water when you add the ginger.
Authentic Chai Tea Recipe
To mix and steep homemade chai, you’ll need a stainless-steel pot with spouts for pouring (about 2-quart size), a large strainer, a 4-cup or larger glass measuring cup, stainless-steel measuring spoons, and a pepper mill. All ingredient amounts are approximate and should be adjusted according to your preferences. Yield: four 8-ounce servings.
- 3-inch-long piece of fresh ginger
- 2 cups filtered water
- 2 heaping tablespoons loose Assam tea, or any loose black tea
- Whole black peppercorns
- 2 heaping tablespoons turbinado sugar, or your favorite sweetener
- 2 cups extra-creamy oat milk, or any creamy milk or milk substitute
- Peel ginger (I use the back of a spoon), grate into a bowl, and set aside. In a stainless-steel stockpot, bring water to a rolling boil. Add loose tea. Add 2 big pinches of ginger. Use a mill to grind 8 twists of black pepper into the boiling water. Add sugar and maintain a rolling boil for a couple of minutes.
- Remove from heat and allow mixture to steep for a couple of minutes longer. Next, add milk, return stockpot to heat, and bring liquid back to boil.
- Remove from heat.
- Strain out the solids, adjust sweetening, and pour liquid into mugs. Enjoy! Chai can be refrigerated and is great the following day. Place the solids in your compost pile.
Renée Benoit
Hereford, Arizona
Tall, Green, and Sweet
“Garden candy” is what I call sugar snap peas. But the peas in my plot are so tall – 6 feet! – that they’ve outgrown the fence I originally built to support them. I needed to improve upon my old plan.
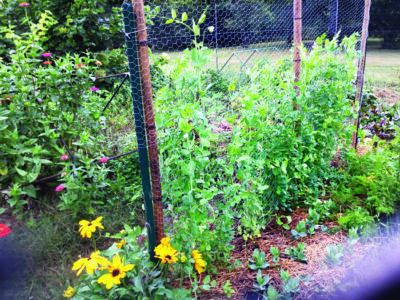
So, I bought three sturdy bamboo poles at a garage sale for almost nothing, and then I found some chicken wire fencing in my own garage. I drove steel U-channel fence posts into the ground at each end of the garden row, wired bamboo poles to the fence posts and added a pole in the middle, stretched the chicken wire across, and secured everything with wire. The new structure works like a charm. I plant peas on both sides of the fence.
Deanna White
Ypsilanti, Michigan
Critter Block
I’ve used this technique to keep critters out of my garden for years. First, I dig a 3-inch-deep trench that’s 8 inches wide around the perimeter of the garden plot. Then, I drive fence stakes into the ground on the garden side of the trench. Next, I wire plastic poultry netting to the vertical stakes, and on the opposite edge, I turn the bottom of the plastic fencing outward about 6 inches, forming an “L” shape with the fencing. Where the bottom corners are open and unprotected, I fill in the gap by tying in place a square piece of fencing. Finally, I fill up the trench with dirt. When the critters try to dig down, they encounter the plastic fencing and give up. You can use metal chicken wire fencing, but I prefer plastic because the metal cuts my fingers.
To block any opossums that try to climb up and over the fencing, I install an 8-inch-wide board that juts outward from the top of the fence and is secured with a metal bracket. (I actually saw an opossum climbing the fence protecting my blueberries years ago.) To stop critters from digging in my potted plants, I cut a circular piece of fencing or screen to fit the inside of the pot, with a 3-inch-diameter circular hole at its center so I can slide the screen around the plant stalk. Then, I wire the screen’s cut edges together. I do this around the bottom of all my fruit trees too. Grass will grow up through the fencing and hide it from view.
Lewis Brackett
San Diego, California
A Shade Better
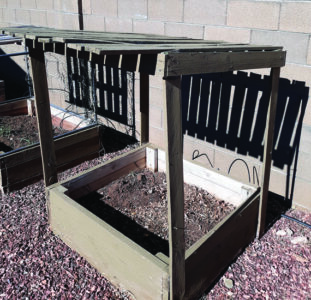
My husband and I have lived in central Arizona for about 25 years. I’ve always had a garden, but I find the soil and weather fluctuations in the Southwest to be challenging. I usually plant my cool-weather seeds – peas, radishes, lettuce – in late March, but by the time they mature, the weather is already too hot. My plants were getting baked in a region where temperatures can switch from cold to hot as early as May.
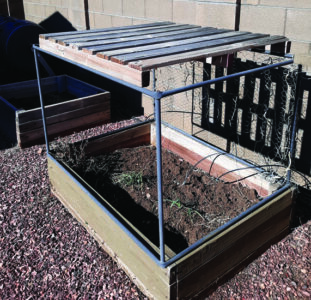
We have clay soil and don’t want to maintain a large garden anymore, because we’re getting older, so my husband built raised-bed box planters for me. He also worked with me to develop the idea of using wooden pallets to protect plants from frost and wind when the weather is cold, and to provide shade and shelter when temperatures turn hot. Our new gardening system is working well. I’m so lucky to have a handyman in the house.
Donna Valerio
Prescott Valley, Arizona
Coming Up Roses
I upcycle used plastic water bottles for starting rose cuttings. It takes a long time for them to root – about six weeks until they’re ready to transplant into a pot. I now have four small blooming bushes ready to transplant, and I’ve picked the first rose from one of them.
Dominic Grillo
Dunedin, Florida
Magpies, Vamoose!
Magpies are wonderful protectors of small birds when cats are on the prowl, but, just like all of us, they get hungry – and chicken eggs are a favorite meal. A magpie will peck a tiny hole in the eggshell and then eat the contents.
I’ve tried a lot of things to keep magpies out of my chicken coop, but this has been the most effective: I tacked some heavy-gauge plastic sheeting over the coop entrance and then cut slits to form slats about 4 to 6 inches apart. Picture a commercial plastic-strip curtain door for a cooler, only on a much smaller scale. My hens can go in and out of the door easily, but the magpies are deterred!
Mary Martin
Rexburg, Idaho
Written in Stone

Different plants are hard to tell apart when they’re just starting to pop out of the ground. I was tired of using cardboard labels and popsicle sticks as markers, so I found rocks around my yard and painted them so I could tell which plants were which. Not only are they helpful, but I also think they’re adorable, and they make a great addition to the raised beds and melon patch. I keep them in my garden much of the year, until winter. I’ve had so much fun sitting outside and painting the rocks with different colors and designs.
Ameya Marshall
Raleigh, North Carolina
Space-Saving Brooder
When adding a few more ducklings and goslings to my flock last spring, I needed a suitable brooder but didn’t want to spend a lot of money on one.
I had some unused 1-by-5-foot shelving boards handy, and bought eight corner braces and four flat mending plates. I made the box two boards high, using the mending plates to keep the boards aligned. Then, I lined the new brooder box with an old plastic tarp, laid cardboard on top of the plastic, and covered it with pine shavings. I covered the top with a section of cattle panel and secured the brooder light to it. To retain heat at night, I added a tarp cover.
After the birds were old enough to move outside, I easily disassembled the boards, hosed off the tarps, and returned the cattle panel to the garden – and didn’t have a bulky brooder taking up space the rest of the year.
Renvy Smith
Rising Star, Texas
Shredded Bedding
I raise chickens and, although I live near several wood mills in southeast Alaska, I find it almost impossible to get dry shavings for my coop. My solution was to buy a 12-sheet crosscut paper shredder from the local Salvation Army thrift store and begin shredding our waste cardboard for poultry bedding.
I’ve found cardboard bedding to be far more absorbent than wood shavings. It keeps odors down better, and it’s lightweight and easy to remove when cleaning the coop. My cardboard bedding also composts much faster than wood shavings, and the worms love it. The best part is it’s free!
Julie Ruhle
Petersburg, Alaska
Readers, we recommend you avoid glossy and heavily printed boxes if you try this method. – Mother
This Garden Advice Is as Nice as (Rhubarb) Pie
Rhubarb is known to prefer cool climates. The blistering summer sun and drying heat here in north central Florida (Zone 8b-9) aren’t conducive to growing the crop, and area gardeners usually experience high failure rates.
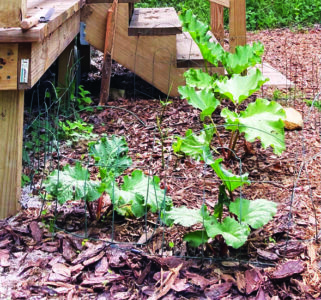
Here’s how we managed to successfully grow hardy rhubarb in our hot climate. First, we selected cultivars suited to our growing Zone. Next, we chose a shady planting location that receives only late-day direct sunlight, facing northwest and backing up to our deck. (The fencing is just to divert the dog from cutting across when she lies under the deck.) We prepared the planting bed with 2 parts rich moisture-retaining soil mixed with 1 part native soil. After planting in early March, we kept the soil cool and moist with non-dyed mulch and regular watering when the rains didn’t come.
Save us a piece of strawberry-rhubarb pie, y’all!
Joy and Bill Zimmer
Old Town, Florida
Raised-Bed Longevity
Many ideas for wood protection have come and gone in our 35 years of using raised beds commercially on our small farm in western Washington. We also currently plant in raised beds for our retirement garden in dry eastern Washington. Some woods, such as black walnut and cypress, will work untreated if you can find them in 2-inch-thick planks. But for untreated dimensional lumber from a lumberyard, or recycled from a different use, the raised-bed walls will often rot in less than 10 years.
Here’s how we’ve kept our raised beds going for over 20 years with no end in sight. We simply line the interior of the assembled sides with a strip of 6-mil black plastic. We make sure the strip covers the top, side, and bottom of each board. We staple or nail the edge of the plastic strip only to the top edge of the top plank, and then we nail lath strips all along the top edges and ends to hold the plastic firmly in place. This also protects the exposed plastic from ultraviolet rays and prevents rips and other forms of damage, thereby extending the life of the liner. The wood of the raised bed should last many maintenance-free years.
Bob Gregson
Spokane, Washington
Garage Door Gardens
Garage door replacement companies usually discard old doors, but having two family members working in the industry has inspired me to let no door go to waste.
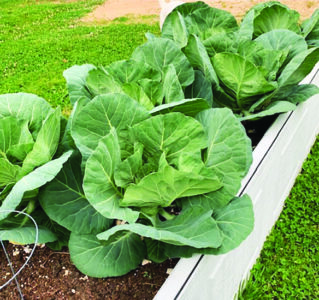
We made a lovely raised garden bed by screwing the insulated door panels to a 4×4 fence post. We filled the door bottom with shavings, compost, and dirt atop logs and sticks. The pictured bed is 3 years old and still going strong.
You can contact your local garage door companies to ask them for replacement garage doors to make your own raised beds.
Stephanie Mise
Lenoir, North Carolina
Shrewd Seed Starting Suggestions
Perfect Pockets
While folding newspaper one day to make zero-waste liners for my kitchen compost pail, I decided to find a use for the single pages that were too small for my pail, which needed a double-page sheet. I folded half of a single sheet in the same pattern as the compost pail liner. It produced a sweet little pocket that’s the perfect size for giving away seedlings.
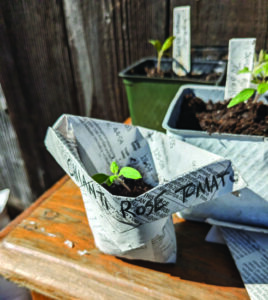
I grow all of my vegetables from seed and often end up with more than I need. So, I gift the excess to neighbors and members of my Buy Nothing group. With these little pockets, I don’t have to worry about getting my pots back! I write the plant name on the newspaper with wax pencil.
Karen Dawson
Santa Rosa, California
Egg-cellent Eggshells
A good way to start seeds is by planting your seed inside an eggshell. When the seedling has grown big enough to plant outdoors, just break the eggshell and spread it around your plant.
Violet Kaselak
Asheville, North Carolina
Trouble-Free Tomato Trays
I’ve ditched the soil when starting tomato seedlings, instead using a shallow tray and a bleach-free brown paper towel that’s been folded in half. I place the seeds I want to sprout along the inside bottom fold of the towel, about an inch apart, then refold the towel and spray it with room-temperature water. Then, I place the towel on the shallow tray and tilt it slightly so any excess water will drain off the paper towel. Cover the tray with something to lessen evaporation, place it somewhere warm (about 70 degrees Fahrenheit), and wait. Be sure to keep the towel moist but not wet.
After the seeds have sprouted and the seedlings are about an inch long, I transfer the best of them to small pots containing soil. As the sprouts are delicate and easy to damage, I move them gently with a moist stick, tweezers, or other small tool. I prepare the soil with a depression in the center of the pot and position the sprout with its top just above the soil level. Next, I fill the rest of the hole with soil, but I don’t compact it – watering will take care of that job. The sprouts don’t have to be vertical or in the exact center of the pot; just let them grow. They will still need warmth from below (about 70 degrees) and good light from above.
This method is especially good with old seeds, allowing you to easily see which ones sprout right away. I use an old microwave tray for bacon that’s perfect for sprouting seeds, because it’s got a built-in tilt and spacers to hold the bacon off the surface so grease can drain into a reservoir at the bottom. We’ve never used it for bacon!
David Cameron
Union Mills, North Carolina


