Put up the summer’s extra harvest in this easy root cellar. This above-ground root cellar design takes advantage of structurally insulated panels (SIPs) for quick construction.
In 2018, we expanded and remodeled our house in Montana. After deciding on a floor plan and arranging contractors and materials, we started the remodel in late March. We wanted to do as much of the work ourselves as we could, not only to save money, but also for the sense of fulfillment.
We decided to use structurally insulated panels (SIP) for the house remodel, as that’s what the original house was built with. While demolishing the old living room, I found that the shed-style roof was constructed with 10-inch-thick SIPs. Throwing the panels out seemed like a waste of good material, and we didn’t want to add that much plastic foam to our local landfill. So, we kept all the SIPs that were large enough to use. We wound up with three 12-by-8-foot panels and one 12-by-6-foot panel. I covered them up and then set them aside until I could find some way to repurpose them.
This past spring, I decided to build an easy root cellar — something my wife has been asking for since we purchased the property in 2010. The land we live on is mostly level, so I couldn’t dig a traditional one into the side of a hill. Instead, I chose to use the leftover SIPs to build an above-ground root cellar.
Easy Root Cellar Walls and Roof with SIPs
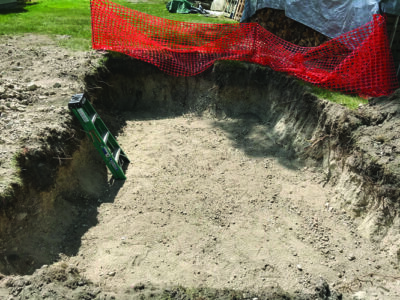
Using my Kubota tractor with a 1-foot bucket, I dug a 14-by-10-foot-wide hole. As I got to about 55 inches deep, just shy of the 5-foot depth I wanted, I hit groundwater. I then had no choice but to backfill the hole to about 42 inches and compact it with a sand and gravel mix. This left about 4 feet of cellar aboveground, which was more than I wanted, but we made the best of it.
After leveling the hole, I placed 10-foot pressure-treated 4x4s across it at 30-inch intervals. The SIPs sit on top of these boards. I squared the 4x4s to the dimensions needed, leveled them, and then staked them in place using concrete form stakes. After that, I backfilled around them to help prevent any movement.
I had to do some work on the SIPs to make them fit my needs. I squared the ends using a borrowed foam cutter, and I lined each 12-foot side that would be sitting on the ground with pressure-treated 2x10s. I used untreated Douglas fir 2x10s to line the rest of the perimeters.
I’d visited a shrimp farm here in Montana prior to our cellar project, and the gentleman who raises the shrimp used SIPs in the construction of his tank room. He painted the entire inside of the room with Flex Seal to protect against humidity (he keeps his tanks at about 78 degrees Fahrenheit), so I thought I’d do the same thing to waterproof my SIPs. I put two coats of Flex Seal on both of the side panels. Flex Seal is thick, so we kept it warm in the house overnight to make applying it easier.
After applying the Flex Seal and allowing it to cure, it was time to put the panels in place. Because of their size and weight, my tractor would just barely lift them, so we resorted to rolling them on spare fence posts to move them around. We rolled the first side panel over to the hole and slid it down inside using 4x4s. Then, we muscled the panel upright and, using pinch bars, moved it into place on the far side of the hole, with the Flex Seal side facing out.
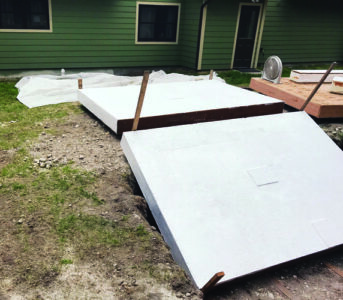
Next, we positioned the back panel. For the back, I cut the 12-by-6-foot SIP to 8 by 6 feet, because I wanted the inside finished dimension of the above ground root cellar to be 10 by 8 feet. Then, using the piece of SIP I’d cut off, I made a piece 6 feet, 14 inches long and spliced it to the 8-by-6-foot panel to create a back wall that’s 7 feet, 2 inches tall. Then, I coated that wall in Flex Seal.
Once the back wall was ready, we slid it down into the hole using the same method as the side wall. Using 12-inch SIP screws salvaged from the demolition, I joined the two panels of the back wall to the inside of the side wall. I used expanding foam sealer between the walls to help waterproof the structure. We installed the second side wall in the same fashion as the first. Then, we moved the three walls into place and squared them using the 4x4s as a guide.
For the roof, we used the third 12-by-8-foot SIP. I wrapped the perimeter of that panel with Douglas fir 2x10s and applied Flex Seal. The roof is supported on one end by the back panel, which is why we made the back shorter than the sides. The roof sits on top of the back panel, making it level with the top of the side walls. To support the roof in the middle, I cut three 4-by-4-inch holes in the side panels at the proper height and spacing, and then ran 4x4s through the holes to create supports for the roof to rest on. I also screwed an 8-foot-long 2×6 underneath each of the 4x4s for added stability. I used Liquid Nails on the back of the 2x6s.
To place the roof, I leaned 4x4s against one of the side panels and then used my tractor to slide the roof up the 4x4s. After it got too high, we muscled it up the rest of the way by hand. I left the side panels loose at the top to allow the roof to drop into place. Then, I added expanding foam to seal the join
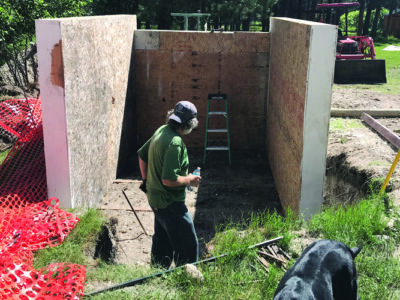
ts, and I tightened all the previously placed 12-inch screws in the side walls. I added more screws around the roof.
Above-Ground Root Cellar Vents
Using a 4-3/8-inch hole saw, I drilled a hole in the back panel and a hole in a side panel for vents. The back hole is 4 inches from the floor, and the hole in the side wall is 4 inches from the ceiling. I used 4-inch green sewer pipe for the root cellar vent system, because it’s almost half the price of water pipe, and the fittings are cheaper. I installed the elbows and pipe and then attached them to the SIPs using plumbers tape and screws. I glued everything but the top elbow, and I left the vertical pipes full-length until I can get dirt mounded back over the root cellar. Once that’s done, I’ll cut them to the proper length.
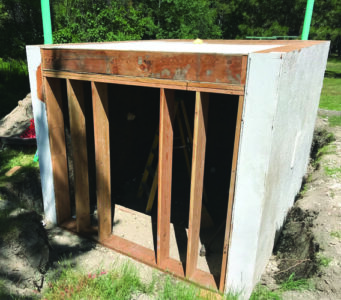
I framed the front wall and door opening conventionally using 2x10s. I wanted a steel-insulated door. I looked at two local resourcing centers but couldn’t find one. As I was leaving the second one, I spotted a walk-in cooler door that was the exact size I needed. I paid $125 for it, as opposed to the $300-plus I would’ve paid for a new pre-hung steel door.
I sheeted the outside front wall of the root cellar and applied Flex Seal before installing the door. I insulated the front wall using leftover fiberglass batting from our house build. Then, I sheeted the inside. The inside and outside sheeting are 5⁄8-inch oriented strand board (OSB) leftover from the build. I used four OSB sheets total. The front wall also supports the roof panel.
Easy SIP Root Cellar: Final Touches
I wanted to paint the inside of the root cellar to brighten it up and make cleaning easier. Not thinking about how the panels had been outside for two years, I painted over the bare OSB without priming them first. Shortly after, I saw a water stain bleed through both coats of paint. To fix this, I covered the interior with oil-based Kilz. It worked like a charm. Then, I caulked all the joints and applied expanding foam around the 4×4 roof supports. I then painted the interior with exterior-grade paint.
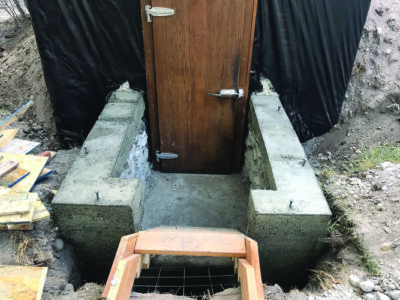
For the flooring, I used 12-foot-long 2x6s that I cut to 10 feet, 3 inches long. Before installing the boards, I gave each one two coats of linseed oil. I also stapled some landscape cloth to the inside perimeter of the root cellar before screwing the flooring down. I spaced the flooring boards about 1/2 inch apart to allow for air movement.
I mixed and poured 17 bags of ready-mix concrete to create a pad outside the cellar entrance to support the stairs. I also stacked native rock around the perimeter of the pad. I’ll use mortar and build the perimeter up to keep the backfilled dirt in place. I built a temporary set of stairs so we could access the inside of the cellar to install shelving. We’ll pour permanent steps later.
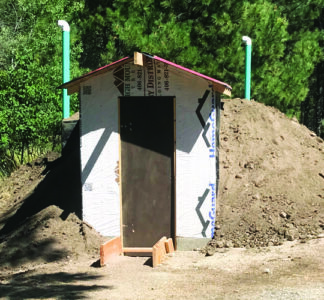
Next, I built a “doghouse” over the cellar entrance as a temporary cover. This will tie in with the future garage we’re planning to build, which will attach to the house. Once it’s all connected, we won’t have to go out in the snow or rain for canned goods. It’ll also help regulate the temperature in the cellar. As added protection, I wrapped the entire cellar with 6-mil plastic sheeting.
Finally, I used dirt to backfill around the sides of the cellar. My tractor won’t reach high enough for the roof, so I’ll have to use a shovel for that part.
When our easy root cellar was finished we installed shelving and moved in all of our canned goods. It’s sure nice to have it organized.
Originally published as “SIP Root Cellar” in the June/July 2023 issue of MOTHER EARTH NEWS and regularly vetted for accuracy.


