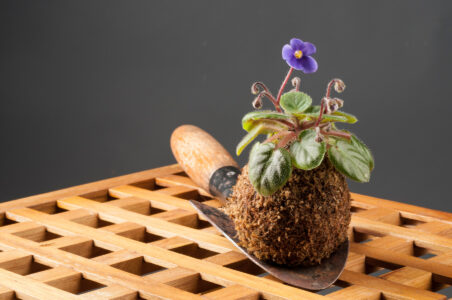
Bring a bit of Buddhist Japan into your home with these green, living plant sculptures. Learn about kokedama care, how to make kokedama balls, and the plants suitable for kokedama.
What is Kokedama
The Japanese art of kokedama developed out of a long tradition first known in China as “Penjing” or “Penzai.” Dating back nearly 2,000 years, Penzai is the art of pruning miniature trees, shrubs, and plants into aesthetically pleasing shapes. It often involved creating entire miniature landscapes in a small tray. Taoist monks in China are thought to have first practiced this art form; they believed that shaping and keeping trees and other plants miniature imbued them with a magical energy.
As Taoist monks migrated to Japan, they brought the Penzai tradition with them. The tradition was adopted by the Japanese as bonsai, and quickly spread from monasteries and temples to the homes of royals and the wealthy. The trend became so popular that in the medieval era, even common people kept bonsai trees in their gardens.
The intentional shaping of natural trees into art objects perfectly reflected the Japanese aesthetic of refinement. As Japanese culture embraced bonsai, it took a place of honor in homes and in the culture. By the 18th century, exhibitions and competitions for bonsai creations spread throughout Japan, and new techniques emerged that furthered the many unique shapes of these tiny trees. Experimentation with flowering trees, minimalist trimming, and even the use of termites to scar and then heal a bonsai gave rise to much creativity.
Kokedama takes its name from koke, which means “moss,” and dama, which means “ball,” and is sometimes called “the poor man’s bonsai.” This is because it’s the combination of three bonsai planting techniques: nearai, bonsai, and kusamono. For example, the nearai-style bonsai involves growing a tree in a small pot so the roots take the shape of the pot. The tree would then be displayed bare, without its pot, but now having an interestingly snarled and imperfect shape. Tray planting, or bonsai, remains the iconic image of a miniature Japanese tree in a low, horizontal tray. Kusamono are bonsai-like displays of wild grasses and flowers in unique pots or moss balls.
Kokedama is a relatively new extension of these ancient bonsai planting traditions, where ornamental plants of all kinds are wrapped in moss and secured with string to create living sculptures. In Japan, the various plant traditions that grew from bonsai have an aesthetic sensibility known as “wabi-sabi.” Buddhist in origin, wabi-sabi is a particularly Japanese take on impermanence, natural processes, and the beauty that exists in imperfection. Nature is full of these examples, and Japanese design in general reflects the wisdom in natural simplicity and flawed beauty.
Kokedama Care
Today, kokedama has become a trendy decorating scheme, as it’s an easy, family-friendly, sustainable, and inexpensive way to showcase indoor plants. Here are a few considerations to get you started.

Soil. Most commercial houseplant soil options will work for kokedama, but a mix that has a bit of clay and some type of humectant matter, such as sphagnum peat moss (this is different from the sphagnum moss with which you’d cover your kokedama), perlite, or vermiculite is best. Add a bit of garden soil (which will likely have traces of clay) to a purchased, premixed potting soil that has one or more humectant, and you’ll get a nice mix. The small amount of clay will help you shape your creation, while the potting mix will feed your plant and keep it moist.
Moss. There are multiple moss options for covering your kokedama. The easiest is rolled sheet moss, though most of these are made from forest moss that’s been preserved and may even be artificially colored. There’s also specialized moss for orchids, and even Spanish moss available, so don’t get confused when shopping.
When I made kokedama at home, I decided to use sphagnum moss. The difference between sphagnum peat moss and sphagnum moss is the manner in which it’s processed and the point at which it’s harvested. Sphagnum moss grows in bogs, and the peat is the sediment in those wet areas comprised of the moss itself, long dead and decomposed, along with other organic materials. The peat moss is harvested after the living moss is dead, and then processed into a powdery, low-pH soil amendment for gardeners. The sphagnum moss you’ll need is the same moss, but it’s harvested while living and growing on top of the bog. It’s then dried and compressed into bags for horticultural use. Soak this moss before using it to create the grassy outer layer of your kokedama.
Plants. Many plants can be used for kokedama displays. Those with small, shallow roots work best, but you can easily repot your plant as it grows. See “Pleasing Plants” below for a list of recommended plant choices and their daily light needs.
Watering. The best part of using kokedama is its sustainable watering technique: Simply set it in a bowl of water and allow it to soak up moisture. Squeeze any excess water back into the bowl, and replace your kokedama in its home. That’s it! I love this because I always spill water and soil on my tables and shelves when watering plants. There’s no mess with kokedama.
Displaying Your Living Art
You have a number of aesthetically pleasing options to display your kokedama. Consider a low, interesting ceramic tray, a piece of drift wood, or another interesting plinth. You can also attach a length of twine or monofilament and hang your kokedama at an eye-catching, asymmetrical angle. Groups of tiny kokedama make lovely coffee table displays and points of interest for a room. If you have extras, kokedama make wonderful gifts for novice and adventurous plant lovers alike.
How to Make Kokedama
Before you begin creating your kokedama, decide where you think your finished living sculpture will live. Once you feel you understand the light in this space, choose your plant accordingly.
Be sure to purchase a small plant in a 4- to 6-inch pot to start; this will make your kokedama creation more manageable.
Materials
- Houseplant of choice (see below)
- Bucket
- 6 to 10 ounces sphagnum moss, or 1 roll sheet moss
- Scissors
- 25 feet of twine or cotton string
- Large bowl (optional)
- Tape
- Garden gloves
- Potting soil
Instructions
- Fill your bucket with water, soaking a few handfuls of sphagnum moss in the water as you work.
- Measure and cut 4 lengths of twine, each about 3 feet long, depending on how large your moss ball will be to accommodate the plant you’re using.
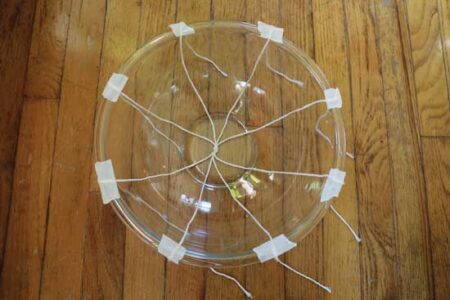
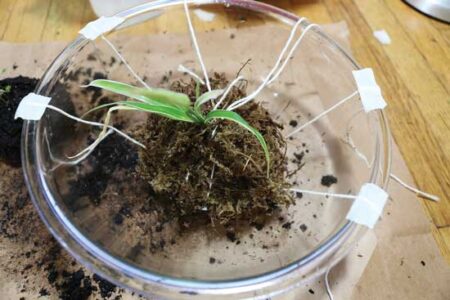
- Gather the lengths of twine, and knot them together in the center. Spread the 8 ends equidistantly in a circle, either in a bowl or on a flat surface. Secure the ends to the surface with tape.
![]()
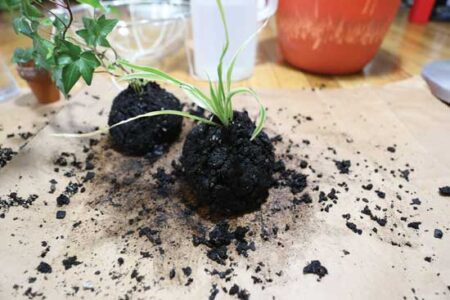
- Don your gloves, scoop your potting mix onto a flat surface, and make a well in the center. Add water in the well and begin folding the mix until you can pack it into a ball that holds together firmly.
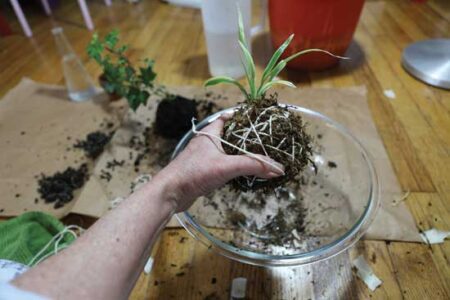
- Unpot your plant and gently shake the soil free from the roots. Set aside.
- Either create a hole in your soil ball large enough for all of your plant’s roots, or slice your soil ball in half, gently lay your plant on one half, and cover with the other. Reform your soil ball around the roots, smoothing over any edges and filling in any holes. Set aside.
![]()
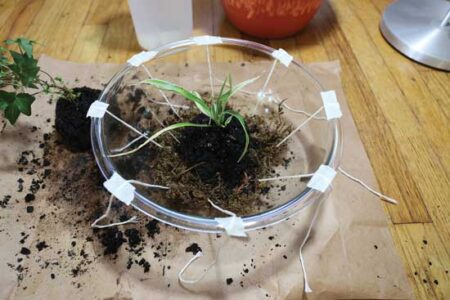
- Take a handful of soaked sphagnum moss, wring it out, and place it over the center knot of your twine. Spread it out until it’s an even thickness. If you’re using rolled moss, cut an appropriately sized piece to wrap around the soil ball. Trim excess and continue to Step 9.
![]()
- Press your planted soil ball into the moss. Press all the moss onto the ball. Add enough moss to cover the entire soil surface in a layer 1/2 to 1 inch thick, eliminating any thin spots of moss to be sure no soil is visible.
![]()
- Tie the strings up over the ball by bringing together opposite ends and knotting them on the top. Repeat until all string ends are tied. Clip any excess.
- Take the loose end of twine from your twine ball and tie it around one string. Gently, but firmly, begin a continuous wrap of string around the entire soil ball to secure the moss. Tuck or tie the loose end when you like how your kokedama looks. Trim any excess.
![]()
Plants Suitable for Kokedama
Low to Moderate Light
- Peace lily (Spathiphyllum spp.)
- Philippine evergreen (Aglaonema commutatum)
- Nerve plant (Fittonia spp.)
- Pothos (Epipremnum aureum)
- English ivy (Hedera helix)
Moderate to Dappled Sunshine
- Lemon button fern (Nephrolepis cordifolia)
- Maidenhair fern (Adiantum spp.)
Bright to Some Direct Sun
- Spider plant (Chlorophytum comosum)
- Philodendron (Philodendron spp.)
- Umbrella plant (Schefflera spp.)
Jean Denney is the Group Editor for Wellness and Gardening at Ogden Publications and a houseplant junkie. Her latest indoor gardening project is a terrarium filled with carnivorous plants.

