
Learn the basics and soldering tips for beginners to help with projects around the farm. Get prepared to learn how to use a soldering iron for the first time and get started in the craft of welding. Excerpt from Farm and Workshop Welding (Fox Chapel Publishing, 2012).
Soldering is a lower-temperature version of bronze brazing, using filler alloys that are less physically strong and melt at lower temperatures. As with bronze work, the bond between metals is not made by fusion. Instead it’s formed partly by the filler hooking into the tiny hills and valleys of the joint metal surfaces, but mainly from the solder dissolving (not melting) into a very shallow surface layer of the joint. So for soldering to work, it must have free access to ultra-clean parent metals. For this reason flux is always used as a chemical backup to mechanical surface cleaning.
Silver soldering suits dissimilar metals and is generally used with capillary joints, leaving little or no external build-up of filler. The filler itself is a fairly expensive mix of copper, zinc and silver which, being tougher than soft solder yet still electrically conductive, is useful where a joint must stand moderate heat and vibration. Electrical heating elements are often silver-soldered. The temperatures needed for silver soldering can only be achieved by a flame (or arc), not an iron. If the work is not too big it can be laid on a firebrick hearth and heated with a small butane torch.
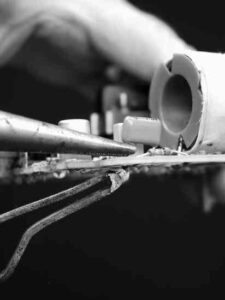 " width="225" height="300" data-tw-width="w-full lg:w-3/4 mx-auto" data-align="aligncenter"/> Whenever an electronic component looks as if it might be cooked, grab its leads with pliers to siphon off soldering heat. "/>
How to Solder: About Solder Flux
Buy the flux when you buy the silver solder. Take great care over preparation. Pre-flux the joint, then dip the rod in flux. Work quickly so the flame does not tarnish the cleaned surfaces. Let the silver solder melt with the heat of the joint metal, not directly by the flame. After soldering the flux residue can be washed off with hot water.
Soft soldering is the much more common form, used on heat-sensitive items or on joints that don’t need much mechanical strength. Filler metal melts at 482ºF (250ºC) or below, so the necessary heat can be transferred from an iron. The alloy is a lead-tin mix, often spiced with antimony. Soft-soldered joints are everywhere — in vehicle wiring, radiator header tanks, plumbing joints in copper pipe. Different metals can be joined too, like copper to steel.
Three things are necessary for soldering success:
- Clean parent metal
- The right temperature
- The right flux
So, effectively it’s brazing all over again. Cleaning is, as ever, a matter of elbow grease. Soft solder is even less tolerant of dirt than bronze, so it’s essential to be thorough. Grind surfaces where possible then bring them to a bright finish with emery cloth. Dubious-looking or corroded surfaces must be scoured clean.

Flux protects the metal from oxidation; breaks down the liquid solder’s surface tension to let it flow; boosts wetting on the metals to be joined and brings some limited cleaning action. Paste fluxes generally have a resin base and are relatively non-corrosive. They’re used primarily for electrical work and come in a tin or as a core in the solder itself. Acid fluxes come in liquid or paste form, have a more vigorous cleaning action and are generally used on plumbing or sheet metal work. Being corrosive, they’re not for delicate electrical stuff and should be washed from both the joint and your hands afterwards.
Iron Options
Heat for soft soldering comes from an iron. Why it’s called an iron when the business end is made from copper isn’t clear, but there it is. The bigger the copper end (or bit), the greater is its heat reservoir, so the bigger the job that can be tackled.
The key thing is to match the iron to the job. If the iron is too small it won’t put enough heat into the work and the solder won’t flow. If it’s too big, access may be difficult and solder will flow all over the shop. And while we’re on the subject, electronic bits and bobs can be terminally damaged by heat – so whenever there’s a risk of cooking a component, say on an alternator diode pack, use long-nosed pliers to divert the threatening therms.
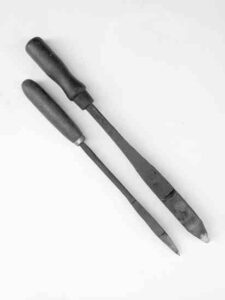
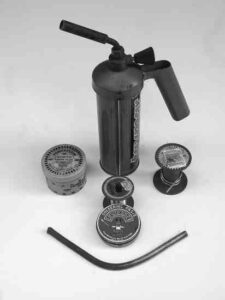
The traditional soldering iron holds its copper bit in a steel/wood handle. The bit is generally heated by blowlamp or propane torch. If you’re pushed a neutral oxyacetylene flame will do, but this must be used with great care if the bit isn’t to be overheated and covered in oxide scale.
How do you know when a traditional iron is hot enough? Settle the flame over the bit’s thickest section. Eventually the metal will flicker clear copper-colored and a green flame will ghost round it, and then you’re ready to boogie.
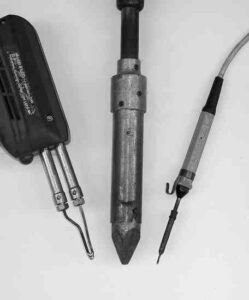
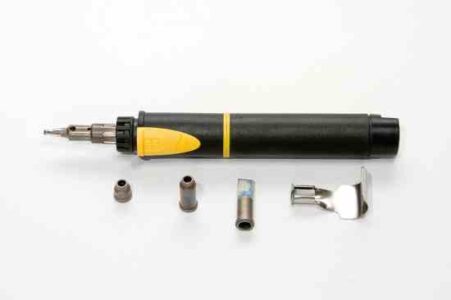
Irons heated by electricity or integral gas container have all but displaced the old sort. Small versions are perfect for wiring and electronic work. Bigger ones can be backed by fast-acting heater coils, making an ‘instant heat’ gun. At the top of the scale are jumbo electric irons, which take an age to get to full working temperature but supply plenty of heat for larger jobs. Self-contained irons heated by butane gas from a canister let you solder anywhere. Ah, the freedom.
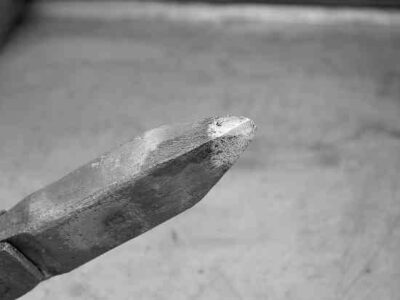
Traditional or modern, any iron has to be cleaned and “tinned” — given a fresh coat of solder — before work. A tatty burnt tip won’t transfer heat quickly and imports oxides to the joint. Titivate a dirty bit by wire-brushing or gently filing it back to bright copper metal while it’s hot. Then tin the tip by sizzling it in flux and flowing on a little solder to form a bright silver jacket. When you need to clean a hot tip during a job, wipe it on a damp cotton cloth.
Making the Connection
Whatever the work, it’s worth remembering that like all glues, a soldered joint is at its strongest where the bond layer is kept thin. If not, joint strength drops to that of the solder itself. Joint design is critical too – soldering works best where the joint has a large surface area, and where it’s loaded in shear rather than peel.
How to Solder: Soldering Copper Wire
Wire soldering can be anything from joining an electric fence’s leads to replacing a tractor battery cable terminal; the principles are the same. Every time you tin the parts first, then join them by heating, adding more solder if needed.
Electrical work needs a non-corrosive flux. Use flux-cored solder and back it up with a separate supply, like a tin of Fry’s Fluxite.
Wire is only clean enough to solder if it’s bright and shiny. Where there’s any sign of corrosion — as there will be in old trailer light cable or anything that’s seen much service and been exposed to the elements — tease out the strands and rub them between folded emery cloth until they shine. Clean your fingers, twizzle the strands back into shape and dip them in the flux pot.
Bring the iron up to temperature, which means a green flame around a traditional copper bit or a good smoking heat for electrical irons. Clean and tin the iron tip, then sizzle it in flux.
Tin the first wire’s end. Lay one face of the iron — not the point — on the cable so maximum heat flows from that wire to the other. The flux will melt first. Leave the iron in place and touch the solder on the wire, not the iron. When the work is hot enough, solder will melt into it.
Don’t transfer liquid solder to the cable with the iron, as the solder will pick up oxides. If the solder won’t melt reasonably quickly, just hold the iron where it is. Reaching melt temperature may take a while, particularly when the iron is only just big enough for the job. Tin the second wire’s end in the same way. Then lay the two tinned wire ends alongside each other. Don’t twist them together as the two will unwind under load — a pull concentrates shearing force in a small area, destroying the bond.
Bring a hot, flux-dipped iron down on the joint, holding it until all the solder turns liquid silver and runs in both halves. If necessary (and if you’ve got three hands) add more solder to the joint to fill gaps.
Take off the heat and hold the wires still until the solder freezes, turning from bright silver to dull grey. Any movement during this step will give a crystalline ‘dry’ joint with little strength and poor conductivity. Clean off flux residue.
The end result takes a fair pull. Twisted wires would unwind under this load.
To insulate the joint, slide on some heat-shrink tubing before soldering. Buy it from auto factors and electronics shops. Gentle heating will shrink the wrap down over the bare wire, giving a finish much tidier and longer-lasting than insulating tape. If waterproofing is required, clean the area then wrap it in self-annealing tape. Available from electronics shops, this bonds with itself to form a waterproof coat.
Adding a Cable Nipple
Soldering a nipple on to a Bowden cable is useful for a quick repair or when making controls for a one-off machine. This technique also covers attaching ‘bullet’ wiring connectors, but for those leave out the last two steps. Use non-corrosive resin-based flux and flux-cored solder, as acid flux will attack and rot the cable strands.
Cut the cable end cleanly. An efficient (if rather unkind) way of doing this is to hold the cable between the cutting jaws of pliers or nippers, lay the pliers on a vise and give the jaws a sharp whack with a copper-faced hammer. Watch out for flying bits — wear goggles.
Clean and tin 1/4″-3/8″ (6-10mm) of the cable end. Old cable will be oil-soaked, so degrease and abrade-clean it first or the solder won’t wet.
Slide the nipple down the cable until 1/8″-5/32″ (3-4mm) is left sticking out. Gently gripping the cable at the right height in a vise makes this easy. Hold a hot, fluxed iron on the nipple and cable until both are smoking, at which point add solder: this should flow down between them. If it won’t, carry on heating or re-clean. Add solder until it pops out at the nipple base and the nipple’s hollow head is part-filled. Let the solder solidify.
Working with a knife blade on the protruding cable, separate individual wire strands and bend them back to form something that looks like a chimney brush. This step is vital for strength: once buried in solder, the splayed ends won’t pull out under load.
Now bury the strands. Turn the cable over and reheat it so the nipple slides upwards, settling the splayed wire ends into the nipple cup.
Turn the cable right way up and add more solder until the nipple cup is filled and all splayed strands are buried. Take off the heat and hold everything steady until the solder sets.
Finish off by grinding back any projecting strand ends. If you’ve forgotten to slide the cable into its outer sheath or have cut it to the wrong length, kick yourself and start again.

Common Soldering Problems
Soldering snags always come down to a lack of heat, contamination or a shortage of flux. Or some combination of these. So problems aren’t hard to fix.
Problem: Solder won’t melt on to the joint or melting stays local, next to the iron. Solder flows sluggishly or not at all.
Cause: Insufficient heat.
Remedy: Check tip is clean, tinned and not covered in heat-transfer reducing oxides. Use flat face of iron for maximum contact area. Don’t be impatient; heat transfer takes time. If none of the above work, the iron is either not hot enough or is too small for the job.
Problem: The joint is up to temperature but solder won’t flow, maybe spreading in some areas but refusing to wet others.
Cause: Surface contamination or inadequate fluxing.
Remedy: Stop trying. Clean the target until it shines. Coat it with flux and try again with a clean, hot, fluxed iron. The problem can also be in the solder itself – dull grey, oxide covered stuff won’t flow easily. Shine it’s surface with emery cloth and try again.
Having difficulty? Go back to basics with How to Weld: Metal Identification Basics, another excerpt from Farm and Workshop Welding.
Reprinted with permission from Farm and Workshop Welding by Andrew Pearce, published by Fox Chapel Publishing, 2012.


