It all began when my son-in-law, Mitch, explained the mouthwatering virtues of smoking meat, something he does on a regular basis, particularly during football season. “You take ribs or a cheap cut of meat, marinate or put a rub on it, stick it in the smoker in the morning, and by evening, you’ve got a meal that’s out of this world,” he said. “Plus, you get to poke around with fire for an afternoon — you can’t lose.” The only problem was, where to find an inexpensive meat smoker.
I had an old Weber charcoal grill, some scraps of 3/4-inch plywood, and a weekend without much on my agenda. So, I concocted my own smoker.
Here’s how I made my “Odds and Ends Smoker” — and how you can make yours.
Tools & Materials
Cut List
- (1) A Back, 3/4-by-15-1/4-by-24-inch plywood
- (2) B Sides, 3/4-by-12-by-24-inch plywood
- (1) C Bottom, 3/4-by-16-3/4-by-13-inch plywood
- (1) D Top, 3/4-by-17-3/4-by-13-inch plywood
- (1) E Door, 3/4-by-16-3/4-by-23-3/4-inch plywood
- (1) F Top door crosspiece, 3/4-by-1-1/2-by-15-1/4-inch plywood
- (1) G Lower door crosspiece, 3/4-by-3/4-by-15-1/4-inch plywood
- (4) H Tray supports, 3/4-by-1-1/2-by-11-inch plywood
- (1) J Vent flap, 3/4-by-4-inch circular cutout
‘Remodel’ the Grill: Inexpensive Meat Smoker Plan
Whether purchased new or used, check to make sure the grill — which will serve as your heat source–is in safe condition. For my smoker, I used a “retired” Weber kettle grill in storage, but you can often pick up grills like this online or at garage sales for under $25 — or, if you’re lucky, on the curb with a “free” sign on them. Check that the intake vents on the bottom of the kettle are operable, both wire grills (the one for coals and the one for meat) are solid, and the ash catcher tray below the grill is intact. You can purchase replacement parts, if needed, online or through some home centers.
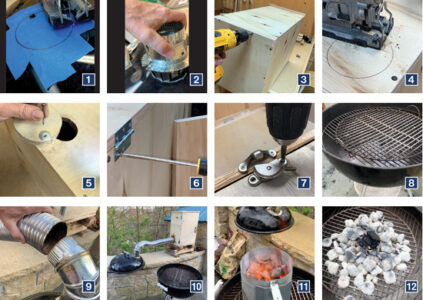
Determine the size of the hole needed for the takeoff collar to fit in the grill; in my case, it was 4-1/2 inches. 1. Mark out the circle on masking tape, which will allow you to see the lines as you cut. Use a 1/2-inch drill bit to bore a starter hole along the perimeter. Then, use a metal-cutting jigsaw blade to cut out the circle. 2. Insert the “fingers” of the takeoff collar into the hole, and then bend them over to secure the collar in place. You can use fireplace caulk to seal any large or excessive gaps.
Build the Smoking Chamber

Steps 1-12.
Plywood may seem like a strange choice of material for the smoking chamber, since fire and wood often don’t mix, but I’ve found it to be a safe, easy-to-work-with choice. Even when the inside temperature of the box reached 250 degrees Fahrenheit, the outside of the box remained only warm to the touch. You can line the inside of your box with metal flashing (if it makes you feel more comfortable) or cedar (for naturalness), but plywood worked fine in my case. The plywood should be relatively flat and clean with one smooth surface for best results.
Use a circular saw with a straight-cutting jig or table saw to cut the back, sides, bottom, top, and door to size. (See Cut List, above.) 3. Use 2-inch all-purpose screws to secure the two sides to the back; position the plywood’s smoothest side to face inward. Install the top so there’s a 1/2-inch lip overhanging both sides and a 1-inch lip beyond the front edge. Install the bottom of the box so there’s a 1-inch lip protruding beyond the front edge. Install the top door crosspiece (F) across the top of the opening, the lower door crosspiece (G) across the bottom (flush with the front edges of the sides), and the four tray supports (H) spaced about 8 inches apart on the interior sides.
4. Use your jigsaw to cut a 4-inch round opening in the smoker box, positioning the edges of the hole 2 inches from the bottom and back. Save the circular cutout. Slip the fingers of the second takeoff collar into the hole, bend them over, and secure each finger with a 1/2-inch sheet metal screw. Then, cut a 3-inch-diameter vent hole in the top of the box. 5. Use a 3/4 -inch screw and small washer to secure the 4-inch circular cutout over the hole to serve as your adjustable damper flap.
Lay the box on its back, and set the door over the opening, making sure there’s a 1/8-inch gap on the top and bottom so the door can swing freely. 6. Install two utility hinges and a handle. 7. Finally, install the double-hung window latch; position it so when it’s in “locked” mode, it pulls the door tightly against the front frame of the box.
Final Setup and ‘Test Drive’

Ensure your meat reaches the right internal temperature when smoking.
Set up your smoker on a hard surface and away from combustibles; a driveway or patio is ideal. Position the smoker box so the metal duct will run slightly uphill from the grill. Make sure you have a noncombustible surface to set the grill lid on when you remove it to add fuel. 8. Position the smaller wire grill on top of and perpendicular to the larger upper grill. 9. Once your setup is arranged properly, install the elbow to the 4-inch grill takeoff collar, and then secure the 8-foot length of metal duct to the elbow and the smoke box takeoff collar using 1/2-inch sheet metal screws. 10. You’re ready to go!
There’s a learning curve in determining how to maintain a steady temperature. You may want to conduct a “meatless” test run, like I did, to figure out how best to monitor and adjust the heat. Temperatures in the smoking chamber will vary depending on the type and quantity of fuel you use, how much air you allow in through the bottom vents, and how much exhaust you allow through the top damper vent. The goal is to maintain a temperature between 225 and 250 degrees inside the smoking chamber.
11. Use a charcoal chimney (or some other method) to get the hardwood charcoal burning, and layer the coals over the wire grills. 12. Spread more charcoal over the coals, and then plunk a few chunks of hardwood (I used hickory) on top of the pile before replacing the cover.

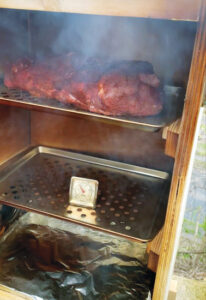
Inside the smoking chamber of the “Odds and Ends Smoker.
Use an oven thermometer inside the smoke box and a meat thermometer stuck through a 1/8-inch drilled hole in the top of the smoke box to monitor temperatures. The exterior meat thermometer will most likely register 20 to 30 degrees cooler than the interior oven thermometer, but it’ll still provide a good way to gauge the temperature inside without having to frequently open the smoking chamber door. Once you’re able to attain and maintain the correct chamber temperature for an hour, you’re ready to start cooking.
Smokin’ Away with Your New Inexpensive Meat Smoker
With your test launch successful, you’re ready for the genuine article. Commonly smoked meats include beef brisket, pork butt or shoulder, and ribs; these are meats where the fats slowly melt, tenderizing the meat and making it easy to shred if desired. Other meat is fair game for smoking to enrich the flavor; beef, pork, lamb, fish, sausage, and chicken can be smoked–and vegetables can be too.
In my test run, I used a standard 15-inch cooling rack to hold the meat. It took about 8 hours for a 3-1/2-pound pork shoulder to reach the recommended internal temperature of 195 degrees. Over the course of those 8 hours, I added fuel about once an hour, and I burned about 10 pounds of hardwood charcoal briquettes and 3 pounds of hardwood hickory chunks. I checked the temperature of the pork shoulder and smoke box every couple of hours to make sure temperatures remained steady once that 225-to-250-degree smoke box temperature was reached.
Gas, electric, or automatic pellet-feeding smokers–ones that don’t need constant “refueling”–don’t need as much attention, with temperatures where you can “set it and forget it.” But I enjoyed fiddling around the garden and tackling outdoor chores while keeping an eye on my smoker.
You’ll find dozens of other DIY smoker plans out there, as well as thousands of opinions on the best way to smoke meat and hundreds of thousands of recipes. But in the end, the main thing is to build the smoker, cook some meat, and have fun doing it.
Spike Carlsen is the author of seven books, including the recently released A Walk Around the Block: Stoplight Secrets, Mischievous Squirrels, Manhole Mysteries & Other Stuff You See Every Day (and Know Nothing About); and The Backyard Homestead Book of Building Projects. Find out more at SpikeCarlsen.
A Go-To Guide for Backyard Grilling Enthusiasts

In Smokehouse Handbook, butcher and charcuterie expert Jake Levin provides a comprehensive guide to help you produce mouthwatering results for multiple meats, from the perfect smoked salmon to a gorgeous smoked brisket. Demystifying the process of selecting the right combination of meat, temperature, and wood, detailed step-by-step photos demonstrate various techniques to achieve the ultimate flavor and texture. To top it off, readers will find a critique of various commercially available smokers; plans and diagrams for building a multipurpose smokehouse; and tons of recipes that’ll wow their friends at their next get-together. This title is available at the MOTHER EARTH NEWS store or by calling 800-234-3368. Item #9360.


