
In 50 Things to Do with a Penknife (Princeton Architectural Press) by Matt Collins, a horticultural consultant at the Garden Museum in London, showcases a practical guide for whittling with a penknife. Matt combines craftsmanship with savvy survival-skill projects that encompass a range of skills levels. Each project is accompanied by detailed step-by-step illustrations, making his book ideal for the creative adventurer.
Sculpting a whistle from the green and lithe stems of a springtime willow is a carving tradition passed down through generations of keen whittlers. As the sap rises and flows through young willow branches during the early summer months, their bark is particularly supple, and subsequently easy to separate from the stem. Because of this, willow is the ideal source material for this satisfying carving project, offering a malleable texture that may be sculpted with relative ease. As with many whittling exercises, this one can take a few tries to master, but the result will be noteworthy, and persistence is the key.

1. For this exercise you’ll need a straight stem of green willow, roughly 5/8 – 3/4 inch in diameter and 8 – 12 inches in length. Using a pull cut, create a shallow slope at one end of the stick.
2. With the slope facing away from you, place the blade of your penknife 1-1/4 inch back from the beginning of the slope cut and make a stop cut.

3. With your knife 3/8 inch back from the stop cut made in step two, push cut downward toward it, carving out a thin wedge.

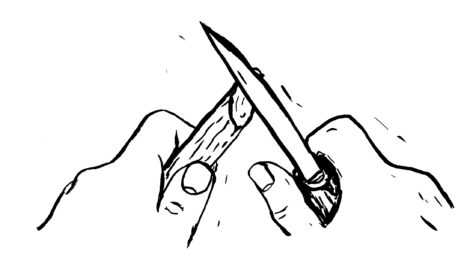
4. You now need to remove the bark without breaking it. Place your penknife blade roughly 4 inches back from the slope, make a circular cut around the stick as deep as the bark. This is best achieved by holding the knife in a fixed position and turning the stick with your other hand.

5. Loosen the bark by placing it on your knee and tapping with the handle of your penknife. Turn the stick in your other hand while you tap, forcing the bark to come away evenly from the stem inside. Take your time with this – you should be able to feel when the bark is ready to be pulled off.

6. Carefully pull the bark from the stick and place it to one side.

7. Taking the bare wood, place your knife inside the groove, against the stop cut made in step two. Use a push cut to remove the top of the stick, creating a flat surface.

8. Repeat steps two and three, making a slightly deeper stop cut this time and push cutting toward it from 3/4 inch back, rather than 3/8 inch.

9. The side profile of your stick should now look like this.

10. Taking the bark section that was removed in step six, carefully slide it back in place, lining up the bark hole with the whistle hole. Blow through; it should whistle! If not, you may need to check that the flat surface made in step seven is flat enough and is letting enough air through.

More from 50 Things to Do with a Penknife:
How to Carve a Fish Hook with a Penknife
Penknife Carving Projects and Techniques
Illustrations by Maria Nilsson from 50 Things to Do with a Penknife by Matt Collins, reprinted with permission from Princeton Architectural Press, 2017.


